How to make and line a perfect tart shell
I truly love making a tart, the combination of a buttery crust with a delicious filling is just perfection.
Tarts are always crowd pleasers, they are perfect for any celebration like birthdays, anniversaries or simply just a gathering with your friends on any season of the year!
Now, lining a tart ring and baking the shell may seem challenging, but trust me that it isn’t. You just need to understand and pay attention to a few things. I am sharing the techniques that I usually use to make the perfect tart shell.

Table of Contents
What are tarts filled with?
A tart shell provides endless options for fillings. The filling can be either sweet or savory, although most times sweet fillings are used. The sweet fillings include jams, pastry cream, ganaches, buttercream, whipped cream, and many others.
Whether you use only one filling or decide to use multiple, a tart will provide an array of flavors and textures. Believe me, nobody will ever complaints about a tart
Also feel free to learn about whipped ganache, and how to make the perfect velvety smooth whipped ganache every single time.
How are tarts decorated?
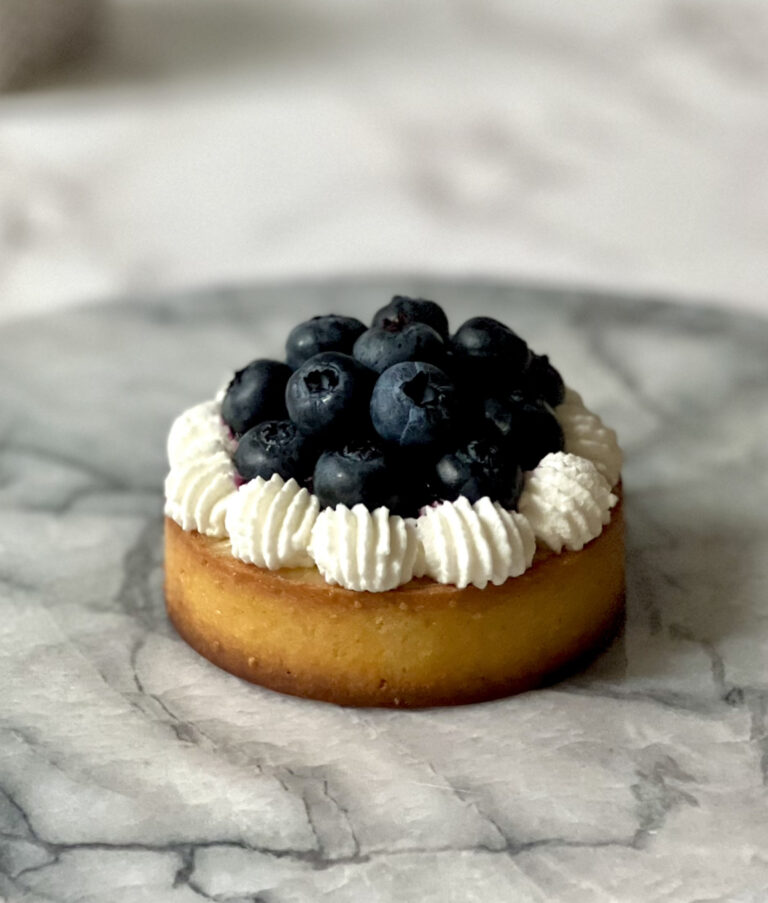
There are many options to decorate a tart, I personally like using smooth whipped ganaches piped on a nice pattern. You can use whipped cream, Chantilly cream, fruits, sprinkles, and many others to decorate as well. A tart can be a canvas for many artistic finishes, so this is a great way for you to explore your inner artist!

What is the difference between a tart and a pie?
A tart is a baked dish that contains a shortcrust pastry on the bottom and the sides, and the filling on the top of the dough. In contrast to a pie, tarts do not have pastry covering the top of the filling and is always open on the top.
Pies are usually made with a flaky dough called pate brisee (from its French term), while a tart is made with doughs that are not flaky but rather crumbly in texture. These doughs can be categorized as pate sucree (a sugary dough), pate sablee (a sandy-like texture dough) and pate-a-foncer.
I use the pate sucree for most of my recipes, this type of dough provides sweetness to my tart, that goes perfectly with fillings that are more acidic or that may lack sugar.

STEP 1 – Making the dough
The first thing to do when you line a tart pan is making the dough. This is a very simple process that involves flour, salt, sugar, cold eggs, and cold butter. You just need to always pay attention to two important aspects: temperature and kneading.
Temperature: the butter and eggs used for your dough should be very cold during the entire process.
Kneading: you will want to knead as little as possible to avoid the formation of gluten. You only want to mix the components until the dough comes together and everything is combined. Avoid overmixing at all costs, this will affect the texture of the crust.
- Cut the cold butter into small cubes, the easiest way to do this is using a bench scraper. If you do not have one, then your knife will be good.
- Add all the ingredients, except the eggs, into the bowl of a stand mixer fitted with a paddle attachment. Then mix on slow until the butter is incorporated, and the dough looks like sand. This process is called “sabler”, a French term that means “to make sand”.
- Then, go and add slowly the cold eggs while mixing on slow, do this until the dough comes together. Depending on the size of the eggs and the humidity, you may need to add more eggs, just do until your dough forms a ball. Then stop and do not mix.
- If your dough is still cold, you can continue with the process. If not, go ahead and wrap it with plastic film and let it rest in the fridge for 15-30min.

STEP 2 – Rolling the dough
- Once your dough is nice and chill, place it on a surface with a little bit of flour on top. Divide the dough into 4 pieces using a knife. Press each portion over the surface by using the palm of your hand. This process is called “fraisage” in French. Try to not overwork the dough and move as fast. Remember that you want the dough to be cold at all times.
- Then, place each portion of dough on top of each other and gently form a disc.
- Sprinkle a little bit of flour if needed. Start rolling the dough with your rolling pin. Rotate the dough as you do this, and if it starts to get sticky, you can add a little bit of flour on top of the dough.
- Roll until the dough is about ¼in or 5mm in thickness.
STEP 3- Lining the tart pan/ring
Large pans:
- Now you can finally line your tart pans. If you are using a large pan the easiest approach is to roll the dough into your rolling pin. Then put it over the pan and gently unroll the dough. Gently lift the sides of the pastry and tuck it into the pan, avoid breaking the dough, this may take some practice.
- Once the dough is nicely tucked in, grab your rolling pin, and pass it through the top of the pan, this will remove the excess dough from the pan.
Rings (small tarts):
Tart rings tent to be a little bit more work to line, particularly if you are making many of them. However, just follow these steps that will help you make a successful tart:
- Once your dough is rolled, cut strips of dough using a small knife or a pizza cutter. The size of the strips will depend on the size of your tart ring, I recommend taking a measuring tape to measure the length and height of the ring. Generally the size will be near 1.5in of height and about 10in of length. The best way to cut the strips is by using your ruler to make marks on the dough and to use as a trace for your pizza cutter.

Then, roll the strip of dough using your fingers, put it inside the tart ring and unroll it, then cut the excess dough with a knife. Gently push the dough against the walls of the ring so it is stable. I recommend putting the ring on top of a piece of parchment paper.

Then, grab a cookie cutter around the size of the tart ring and cut the rolled dough to get the bottom of the tart. Place the disc inside the tart and press it gently against the sides until they are combined. Try to be very gentle so you do not overwork the dough.
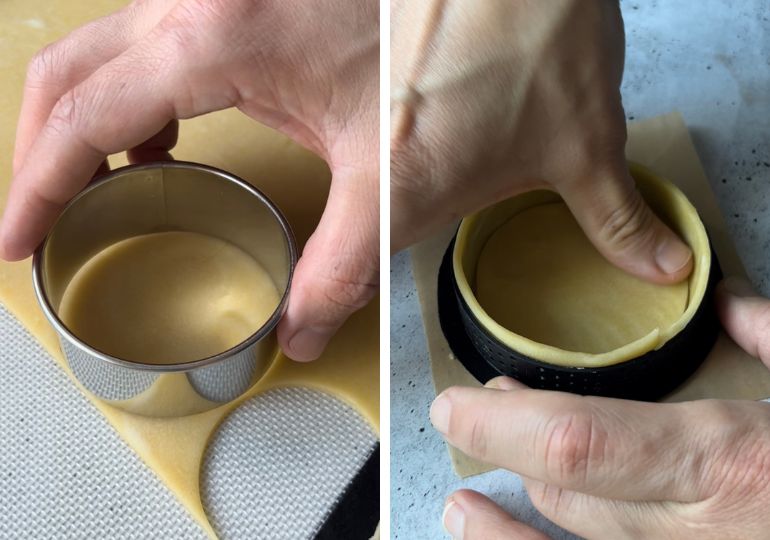
Score the dough with a fork, this is important to let the steam release while baking, otherwise the dough will puff. I recommend placing the tart ring inside the freezer for 15min. Once it is nice and cold, take it out and using a small knife cut the edges of the ring to remove the excess of dough.

STEP 4 – Baking the tart shells
Preheat your oven to 350F
Before putting your beautifully lined pans/rings into the oven there is one more step to do – fill with baking weights. Doing this will avoid the dough to puff while in the oven. Use parchment paper to cover the bottom and sides of your ring and put weights meticulously tucked all over the tart shell. I use ceramic weights that are available in any baking store or online, but you can use dry beans or chickpeas, which can be reused after they cool down.

You can now put your tart in the oven. Bake for about 15-20 min, or until the edges of the tart are dry, at this point you can take from the oven and remove the weights.
Let the tart shell cool and brush with the egg wash to make it shiny. The egg wash I use is simply lightly whisked egg yolks with a little bit of heavy cream to make them thinner. Once the shell is cool grab your pastry brush and gently brush the egg wash on the edges and inside the tart shell. Put the tart inside the oven and bake for another 5 min or until it becomes golden brown.

Writing about lining tarts really made me hungry and now I need to go and bake one for myself for dessert tonight. I plan to use a pear compote with fresh pears that I bought at the marker and a milk chocolate ganache; this combination is a dream!
Equipment
- Baking weights or beans
- Docker or fork
- Pastry brush
- Tart ring or pan
- Small knife or pizza cutter
- Baking tray lined with baking paper
- Rolling pin
- Ruler
- Ovenproof cling film or parchment paper
Tart Recipe Ideas
Here are some delicious and stunning tart recipes you will want to check out.
Printable Recipe

How to Make A Shortcrust
Ingredients
- 340 g all-purpose flour
- 225 g butter cut into 1-inch pieces cold
- 112 g powdered sugar
- 3.5 g Kosher salt
- 2 egg yolks lightly beaten
- ½ egg lightly beaten
Instructions
- Preheat oven to 350F
- Cut the butter into small uniform pieces (1 inch),
- In the bowl of a stand mixer fitted with a paddle, add flour, sugar, salt and cold butter. Mix butter into flour on low speed until almost incorporated, it should look like sand texture.
- Add eggs and egg yolks all at once but slowly.
- Continue to mix until eggs are incorporated, butter is completely mix and the dough comes together. Do not overmix.
- Form a disc, cover with plastic film, and let rest in the fridge.
- Roll onto desired tart pan, score the dough with a fork or a paring knife.
- Freeze the tart mold for about 15-30min.
- Place the frozen mold directly in the oven and partially bake at 350F for about 15min.
- Remove from the oven, let cool and fill ¾ with the frangipane.
- Place back in the oven and bake for another 15, until the frangipane is cooked, use a toothpick to check by poking the frangipane, the toothpick should be clean.


Hello, would you be able to say how long the shortcrust can keep its “crust quality” (croustillant) after it’s been baked? (when kept in an airtight container outside the fridge)?
Thank you for your reply.
Hi, I would say for 1 – 2 days. However, the best way to store is in airtight container in the freezer.
Thank you soooo much for sharing your expertise in teaching me how to do this! I’ve been wanting to try and you have inspired me to take the leap! 🩷🩷🩷